Tuesday, June 30, 2015

Stuffed Portobello Mushroom Caps


So the other day for lunch, I had these portobello mushroom caps, so I decided I would try out a new recipe and it came out sooooo good! I stuffed these mushrooms with mozzarella cheese, roasted red peppers, and bacon bits. It came out to about 7 WW points for both of the mushrooms (it might vary though depending on the weight of the mushrooms you are using). Here's how I did it:
*First wash the mushrooms and remove the stems and spoon out some if it, so you create a deep little dish.
*Then I used 2/3 cup mozzarella cheese and spread it inside.
*I used about 1/2 cup of roasted red peppers (you can find them in a jar, bottled in water)
*At this point you can keep them vegetarian, but the meat eater in me wanted a little something, so I used 2 tablespoons of real bacon bits for the topping!
*I then baked them at 375 degrees for about 20-25 minutes

They were very filling, I could have probably gotten full on just one, but I didn't eat breakfast that morning! :) I'm going to use this idea to make it for dinner and just vary the ingredients; maybe add some spinach and ground turkey. The possibilities are endless! Hope you enjoy!

Dusty Grapes

So, since I've been on Weight Watchers these past two months or so, I try to keep up finding new tasty recipes! I came upon this recipe on pinterest. If you have a sweet tooth like me, but are trying to be healthy, this is for you! It's called dusty grapes! These grapes are frozen and covered in sugar free jello flavoring and taste absolutely yummy! I eat them in 1/2 cup servings, which only come out to 2 WW points total!
To make them, you need to wash them very well and pat dry the grapes. I didn't leave them out to dry, you want to keep them a little moist. Then I found that if you freeze them for a bit prior to putting on the jello, the gelatin will stick better to the grapes, so put them in the freezer for about 2 hours of so. After that, pull them out and put them in a zip lock bag and pour in the whole packet of jello flavoring and shake! I have only used cherry and raspberry so far, but you can use any flavor you like! There's peach, lime, orange, etc! The flavor combination is up to you! Once you put the flavoring in, let them freeze completely (which usually takes a few more hours) and there you go; dusty grapes! A healthy snack to help with your sweet tooth! 

Wednesday, June 17, 2015

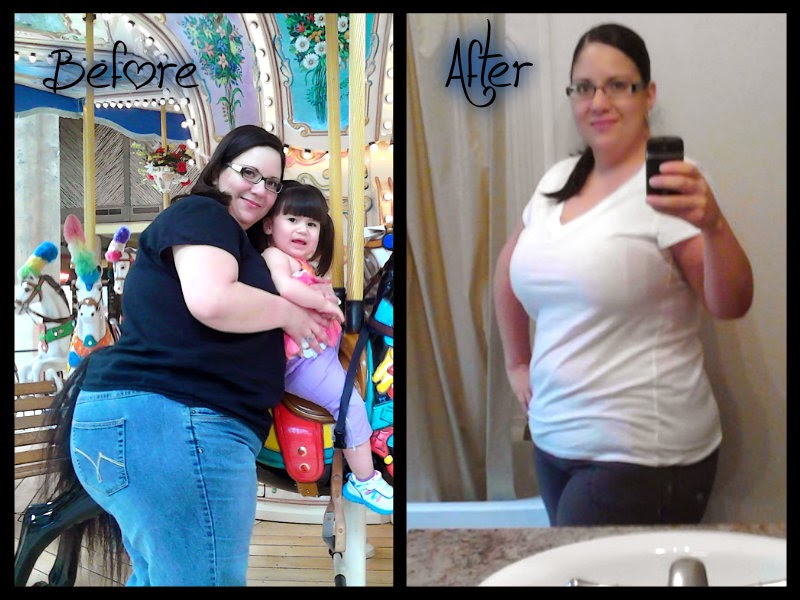
My Weight Loss Journey Continues After Baby

In a previous post, I wrote about losing 40 pounds! It took me over a year to achieve, but with hard work and dedication, I did it! Now, I'm at it again! After losing the 40 pounds, I got pregnant. At that time I had gained 10 pounds from my lowest weight (I took a mini-break from dieting and it showed!) It was a little bit hard to see the scale move up (30 pounds total!), but I knew that I was a lot healthier in this pregnancy, compared to the others. After I had the baby, I lost 20 pounds almost immediately. Now, here I am again trying to lose the weight. 
I decided to go with Weight Watchers again, since I had success with it last time. I've been on it for almost a month and have lost nearly 10 pounds! With their points plus system, I get extra points since I am exclusively breastfeeding my son, but honestly sometimes I don't think I need it! I eat three meals a day, plus snack and still usually have 10 or more points left daily! But having those extra points left over make me feel good, just knowing if I need a snack or want a treat, I can have one! I hope within this blog, to put in some of my WW friendly recipes!
As far as exercise, its been tough. I don't get much sleep because of the baby, so I am tired! So, its hard to find the energy to do it. So far, I went back to my "old faithful" exercise videos; Leslie Sansone's Walk with Me fitness program. I used to do the 30 minute workout, but now its so hard to find the time with my 3 kiddos, so for now I use a 15 minute speed walking workout. At first, I didn't think it would make much of a difference, but it has! I just have to tell myself that's 15 minutes that I don't spend sitting down! I really enjoy Leslie's videos, because they are easy to follow and and are doable when you're overweight. I tried several different video before and they were so fast paced, I couldn't go beyond doing 3 minutes! Here's a link to the video I use:


 Now the video is a little dated, but it at least gets the job done! Now that I'm building my stamina back up, I hope to do longer videos soon! 

Saturday, June 13, 2015

I'm Back!!!

It has been VERY long since I have posted anything on this blog. I kind of lost interest in it after I noticed that no one was really reading it! But, I think I shall continue with it, because it gives me an outlet for my thoughts!

Well, a lot has happened since the last time I was on here; first off, I had a baby! My husband and I had our first baby boy (but 3rd child) in April! We named him Rudolfo Narciso Romero. It was one heck of a pregnancy, followed by one heck of a birth. I had a few complications and ended up not getting the epidural I begged for. After 13 hours, I had a natural birth to this handsome guy! I was in a lot of pain, but he was so worth it and I would do it all over again!

Besides the birth of our new baby, my two girls are growing up way too fast! My oldest will be 4 at the end of June and our younger daughter will be 3 at the beginning of July! They both are keeping me really busy! Sofia (the youngest girl) will hopefully be heading into headstart this fall, along with her sister, Lorena. Lorena's first year of headstart was a success! She had a rocky start for the first month or so, but finally adjusted quickly and progressed so much throughout the year! We are so proud of her!
So what's it like having three kids all under the age of four under one roof? Absolutely crazy! Most days are hectic, overwhelming, frustrating, amazingly beautiful, unique, and entertaining all in the same day. No one ever said that parenting is easy, because God knows it's not. It has its ugly moments, but also its beautiful ones and I wouldn't change that for the world! I am so glad I have the opportunity to raise my little ones and watch them grow every day! 

So besides the little update on my kids, I will hopefully continue to write on this blog about my life and give some tips along the way!

Monday, May 5, 2014

My Weight Loss Journey

My whole life I have been overweight. Of course throughout the years it has bothered me, but I never did anything to change it. That was until January of last year. My husband and I were both at our peak of "fatness." He weighed 270 and I weighed 250. We decided together that we were going to go on a diet and start exercising. Now over a year later, I am proud to say I have lost over 40 pounds! 

It has definitely been a daunting task. I've had my ups and downs, my good days, even better days, and days where I wanted to disappear from the earth. But through all the struggles, I have found the courage to make a change for the better. I may have my days where I cheat (for instance, I ate like 10 cookies today!), but I always start the next day fresh.  I'm human..I make mistakes. I may not always learn from those mistakes, but I try to make better choices the next time around.

There were times where I would get so disappointed and overwhelmed. I wouldn't lose any weight for months at a time. I would read stories of women who would lose 80 or a 100 pounds a more in the same time period it has taken me to lose 40! But, I've come to the realization that I am for once, really happy with how I look and how I feel. I am not "skinny" by any means, but I am a lot healthier and am much more confident. 

These past 16 months, I lived my life. I ate healthier, but enjoyed a slice of cake on occasion. I learned to be more active. I never got a chance to go to a gym; mostly because I live in rural area and because I have to stay home to take care of my two daughters. I walked! At first 30-35 minutes at a very slow pace. I have now worked up to a 45 minute (almost 3 mile) walk/jog. For me, this has been just right, Maybe that is why my progress has been more slow, but it's okay. It works for me! 

It took me a while to find what worked for me. At first, I used something called the Military diet. You can find it on Pinterest. It might be a fad diet, but it did work for me in the beginning. It kicked started my body and I lost about 15 pounds after doing it (and exercise) for 3 months. Then I tried not eating as much...I lost some...slowly...but who wants to be starving!? Not me! So then I tried Slim Fast. Lost about 5 pounds, but still found myself hungry. Then I turned to Weight Watchers. I can honestly say I liked it the most! I at 3 meals a day and never found myself to be hungry. I would eat mostly anything (except I really cut back on the junk foods).  Now, I'm not following any particular diet. Just eating healthy and exercising 5 days a week.

When I first started, I never even thought I would lose a pound. Now with these 40 pounds gone, I am down 3 dress sizes. I can wear clothes that I would never had worn before. I want my confidence to shine through... I am beautiful...I am strong....I am healthy...I am happy! If you too are on a weight loss journey, don't give up hope...you can do this!


Friday, April 18, 2014

Coconut Poke Cake!


I Love Love Love to bake! I have a sweet tooth like no other! My husband and I have been dieting over this past year, so I don't eat sweets like I used to...Now it has turned into a once in a while treat! Every other weekend or so, we travel to see my In-Laws (who I absolutely love!). My parents in law are fellow sweet-a-holics, so on those weekends, I usually bake something to take with us (since they usually always have a full house, we don't have to worry about eating too much!) 

So for this weekend, I am taking one of our new favorites, Coconut Poke Cake! I found a recipe similar to this on Pinterest, but I changed it up a bit. The ones that I did see, called for cream of coconut, rather than coconut milk and sweetened condensed milk.  I thought that by adding the cream of coconut with the condensed milk would be overly sweet, so I instead used coconut milk. And let me tell you, it came out Yummy! 
For the Ingredients you will need:
1. Any Brand White Cake Mix
2. Sweetened Condensed Milk
3. Sweetened Coconut Flakes
4. Coconut Milk
5. Whipped Topping (Cool Whip)

DIRECTIONS:
1. First, bake cake as directed on box.
2. While the cake is baking, take your coconut (about 1-2 cups, depending on how much you want) and toast it.  You can put in the oven on a baking sheet, but I prefer to toast it on a non-stick pan while the cake is cooking, that way I don't bother the cake as it's baking! I like my coconut to be really toasty and crunchy...I think it makes the cake test better! But of course it is up to you on how toasty you want it! I think I ended up toasting mine for about 10 minutes on low-medium heat.
 3. By this time your cake should be coming out of the oven! Get it out and let it cool for about 12-15 minutes.
4. Once your cake has cooled, use the end of a wooden spoon and poke holes all over the cake...it should look something like this:

5. Next, mix together your coconut milk and sweetened condensed milk together and pour it all over the cake to let it soak in!

6. Once you have poured the coconut mixture all over your cake, it is best to put it in the fridge and let it cool for at least a couple of hours (overnight is best).
7. Now, when your cake is cooled, take the cool whip and frost the cake. Then top it with your toasted coconut and there you have it-An absolutely delicious Coconut Poke Cake!


Enjoy!


Tuesday, April 8, 2014

Hair Bow Triumphs and Disasters

So something you need to know about me...Sometimes I'll find a new "hobby" and become obsessed with it...case in point-Hair Bows! For the past two weeks, I have created probably over a dozen bows (see, the word obsession totally fits in here!) for my daughters. They range from simple to well, over the top! Here is my newest creation...

This is called a burst bow! I ended up finding some great tutorials online from MommyCraftsAlot. I'll put a link to her tutorials here to guide you in making your own bow! I'm really pleased in how this bow came out, except for the "disaster" part that I pointed out in my title....So, here's the scenario: I'm making my bow, hot gluing the center, when I decided to not pay attention and instead of gluing it to the bow itself, Miss genius over here glued it to my finger. So of course, when something like this happens, you remain calm, Ummm....NO! I freaked out, screamed, and tried to pull the glue off...would have worked, except for one thing, the glue was still hot and instead just pulled off a couple of layers of skin, along with the glue.....So needless to say, I definitely sacrificed something for this bow....Now my finger is red, swollen, and blistered and I'm typing with one hand...Awesome....My daughter better at least get one complement, or else!

Anyhow, back to the bows! I'll post some more pictures of my other creations some other time.  Right now, the kids are asleep and I think it's time for another cup of coffee and some Tylenol! If you are interested in creating this bow, just follow the links!


-Daniela


Burst Bow Tutorial
https://www.youtube.com/watch?v=xc616lw-KSE

How to Make Spikes for Bow
https://www.youtube.com/watch?v=lXdVKfs-q4c